
Let’s be honest: Shopping for a barn door hardware kit can be confusing.
Unless you are a seasoned contractor who has done multiple installations, the thought of installing a hardware kit can be intimidating.
What type of installation should you choose – single door, double door, bypass? How long should the track be? What style of hanger will be best? These are just a few of the questions that you might be thinking as you prepare to install your new sliding door
The good news is, installing a barn door hardware kit is actually easier than installing a conventional door and can be done by the average person with just a few tools.
In this article we are going to discuss the various components of the barn door hardware kit and explain what each part does.
Installation Configurations
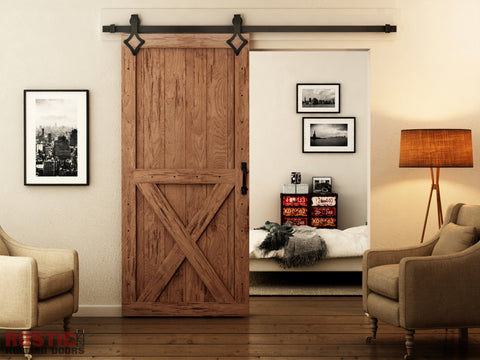
Single Door – one door mounted on a single track. Generally the track is 2x as long as the width of the door, so that the doorway can be completely accessible when in the open position.
This requires you to have sufficient space on at least one side of your opening to mount the track and to accommodate the door to slide open.
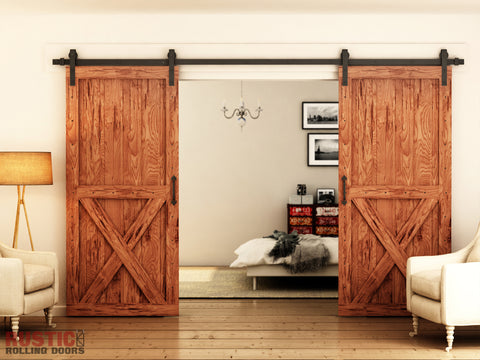
Double Door – two doors mounted on a single track. In this case our track needs to be at least 2x as long as the combined width of the doors.
If our two doors are each 3’ wide, then we will need a 12’ long track.
Generally, each door is pushed to its respective side of the doorway when opening the doors, so this requires clearance on either side of the doorway equal to the width of a single door.
Single track installations typically require between 4-3/8” and 6” (depending on the hanger style) of clearance above the doorway to allow the hangers to roll along the track.
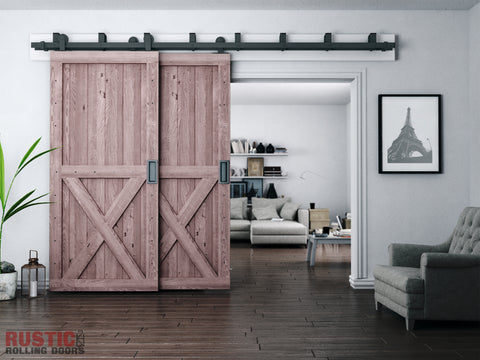
Bypass – The typical bypass configuration has two doors on two tracks. The inside track is mounted to the wall with wall spacers, while the outside track is mounted to wall spacers which are fastened to bypass brackets.
The bypass brackets are mounted to the wall, but hang down in front of the inside track so that both tracks are parallel.
This configuration allows both doors to slide along the entire width of the track, independently of each other. It also allows the doors to be “stacked” on top of one another when in the open position.
A bypass configuration is selected when there is insufficient clearance on either side of the doorway for a double door configuration. For wider doorways, multiple doors can be mounted on either of the two tracks.
Bypass installations require between 7-5/16” to 12” (depending on the kit) of clearance above the doorway to install the bypass brackets.
Barn Door Hardware Components
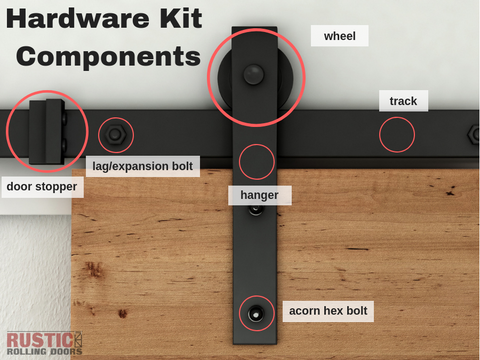
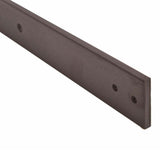 Track – also called a “rail,” is the long straight bar that is installed above the doorway, which supports the weight of the door and allows the rollers to slide from one side to the other. All of the hardware kits come with pre-drilled tacks so that the weight is distributed evenly along the length of the track. Because the top of the track (where the wheel contacts the track) is flat as opposed to round, it is called a “flat track” hardware kit.
Hangers – also called “rollers,” are the hardware parts that mount onto the door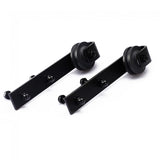 and allow the door to be hung on the track. The hanger has a wheel (or roller) which enables the door to roll along the track when opening or closing the door. Hangers come in many designs and finishes, which allow you to customize the look of your barn door hardware installation. Some of the most popular styles are the Low Profile and Classic Strap.
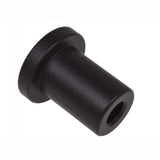 Wall Spacers – also called “standoffs” or sometimes simply referred to as “spacers,” are the cylinder-shaped steel pieces that hold the track away from the wall so that the hangers don’t hit the wall when rolling along the track. The length of the spacer will determine how far the door is away from the wall.
Spacer Extenders – thick plastic washers that are mounted between the wall and the base of the wall spacer. These are used when a thicker door is being mounted as it pushes the entire installation out from the wall and allows the thicker door to pass without hitting the other door (in the case of a bypass installation) or the wall. Spacer extenders are not standard in a hardware kit, but can be purchased separately.
Acorn Hex Bolts – are used to mount the hanger to the door. The bolts are inserted from the back of the door and secured with the decorative acorn-shaped nut on the front of the door. For doors that are thicker than 2”, longer hex bolts can be purchased to accommodate the thicker door.
 Door Stoppers – determine the stopping position of the door. The stoppers are installed from the end of the track and are adjustable, so the stopper can be placed at any location along the track by tightening the securing screws.
![]() Lag Bolts/Expansion Bolts – are used to mount the track to the wall, by securing the track to the wall spacer. The Lag Bolts have a pointed tip and sharp thread which makes them suited to install into wooden studs or a wooden header board. Expansion bolts fit into an anchor which is mounted into the wall. These are typically used when the kit is installed into masonry, brick or concrete.
Lag Bolts/Expansion Bolts – are used to mount the track to the wall, by securing the track to the wall spacer. The Lag Bolts have a pointed tip and sharp thread which makes them suited to install into wooden studs or a wooden header board. Expansion bolts fit into an anchor which is mounted into the wall. These are typically used when the kit is installed into masonry, brick or concrete.
 Floor Guides – These come in many different shapes and sizes, but the purpose of the floor guide is to keep the door from swaying back and forth when sliding along the track. The standard floor guide included in most hardware kits is the fin-style guide. This guide requires that a channel be routed lengthwise into the bottom of the door. The guide is mounted to the floor and the fin fits into the channel and keeps the door on course when being opened or closed.
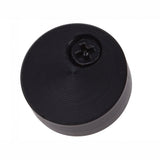 Anti-jump Pads – also called “anti-jump blocks,” are small disks that are screwed into the top of the door and prevent it from coming off the track.
 Junction Plate – also called a “splice plate,” fastens two tracks together. For hardware kits with tracks longer than 8’, the kit is shipped in shorter track lengths and the tracks are spliced together using the junction plate. The plate is screwed into pre-drilled holes at the ends of the track. It is mounted on the bottom half of the track so that it doesn’t interfere with the roller as it passes the splice point.
Bypass Kit Components
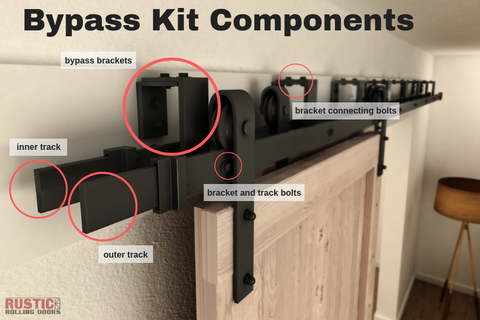
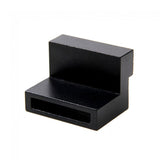
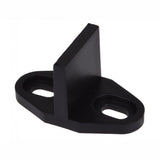
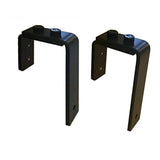 Bypass Brackets – these “L” shaped brackets fit together to form a “U” shape. They mount to the wall and extend over the inner track. This allows the outer track (or “bypass track”) to be mounted parallel to the inner track, so that both bypass doors are at the same height.
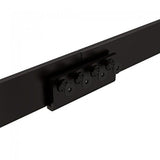
Bracket Connecting Bolts – fasten the two parts of the bypass bracket together.
Bracket and Track Bolts – fasten the outer track to the bypass bracket.
Suggested Overlap
Single / Double Door Installation: For a single or double door installation it is recommended that there is at least 2” of overlap between the sides of the door and the sides of the doorway as well as 1” of overlap between the top of the door and the top of the doorway.
Because the door is not flush with the door frame (it is in front of the opening) there needs to be some overlap for sound protection and to prevent line-of-sight into the next room.
Bypass Door Installation: For a bypass barn door installation, 2” of overlap (from center) between the bypass doors is recommended, in addition to the overlap on the sides and top.